

Daniel Foster just came to me and said, “Hey, I didn’t know that the Andersen-Forbes Analyzed Text has two resource-specific visual filters!” I said, “Sure, I thought everybody knew that.”
Well, if Daniel doesn’t know … okay, I guess almost nobody knows.
Visual What?
“Visual filter” may sound like something you do to a photograph to reduce red eye, but in fact it’s a simple and flexible feature that the Libronix DLS can use to modify a book’s formatting or content on the fly — that is, right when it’s being displayed. A simple visual filter is the Page Numbers visual filter, which shows page numbers inline (for resources that have page number tagging).
To turn on the Page Numbers visual filter:
- With no books open, choose View | Visual Filters from the LDLS main menu.
- Chose the Page Numbers item from the list of available filters on the left.
- Click the Add button to add it to the list of active filters on the right.
Now any book in your library that has page number tagging will show those page numbers inline in the text, like so:
Resource-Specific Visual Filters
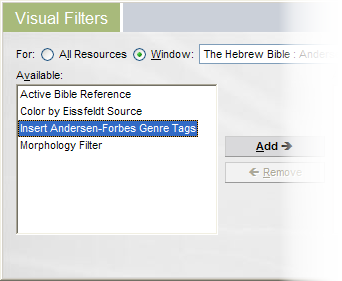
I just had you turn on the Page Numbers visual filter for every book in your library, but we could have turned it on for only one resource instead. In fact, some visual filters only apply to certain types of resources (say, morphologically tagged Bibles) or even certain individual resources. To turn on a resource-specific visual filter:
- Open the Andersen-Forbes Analyzed Text resource.
- Choose View | Visual Filters from the LDLS main menu.
- Choose the “Window” radio button at the top of the dialog, and make sure that the drop-down list contains the title of the book you want to “filterize.”
- Choose the the filter to apply from the list of available filters and click the Add button to add it. Click the Details button to specify additional settings for the filter, if their are any.
Which brings me back to …
… the two resource-specific visual filters that apply only to the Andersen-Forbes Analyzed Text (AFAT) of the Hebrew Bible. To get access to these filters, you have to open AFAT, and then choose View | Visual Filters from the main menu. If you have some other book open, these two filters won’t show up, because they don’t apply to just any old book they’re specific to AFAT only.
The Insert Andersen-Forbes Genre Tags visual filter inserts inline genre indicators into the AFAT resource. When the visual filter is applied, each block of text is introduced by a genre label, according to the Andersen-Forbes genre scheme. For example, a block of narrative will be introduced by the label [Narrative]:
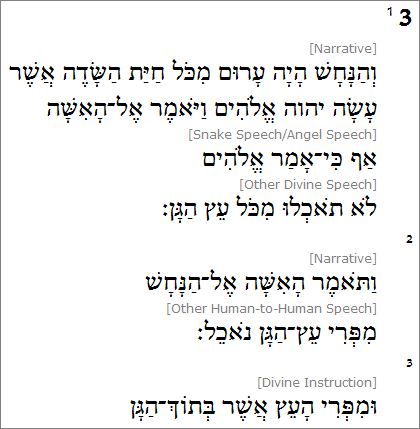
Genre labeling of Genesis 3
The Color by Eissfeldt Source visual filter adds color highlighting to The Hebrew Bible : Andersen-Forbes Analyzed Text resource based on documentary source attributions for the hexeteuch, or the first six books of the Hebrew Bible. Eissfeldt’s sources are colored thusly:
- red Yahwist (J)
- blue Elohist (E)
- green Deuteronomist (D)
- purple Priestly (P)
- orange Holiness Code (H)
- navy Lay (L)

Source coloration of Genesis 2
You can turn either or both of these filters on or off at will by calling up View | Visual Filters. Now you know, which (as they say) is half the battle.


